
Precision 5‑Axis CNC Machining: How to Set Up Free‑Form Toolpaths for Complex Turbine Blades
Date:2026-06-15Article editor:Starting Point PrecisionViews:63Turbine blades feature twisted airfoils, variable thickness, and internal cooling channels. Machining them with micron accuracy requires precision 5‑axis CNC combined with free‑form toolpaths. But the key question is: how do you set up these toolpaths correctly? This article provides a step‑by‑step guide to configuring free‑form toolpaths that unlock the full potential of 5‑axis machining.
Blade surfaces are free‑form – no straight lines or constant radii. Undercuts, thin trailing edges, and superalloys like Inconel demand constant tool orientation changes. Without proper toolpath setup, you risk gouging, vibration, or broken tools.
Setting up free‑form toolpaths involves five critical steps. Each directly affects surface finish, cycle time, and tool life.
Start with a clean STEP or IGES file of the turbine blade. Align the blade’s stacking axis (usually the Z‑axis) to the machine’s rotary table center. Incorrect alignment will cause collisions. Use CAM software such as NX or PowerMill – an comparison of 5‑axis CAM toolscan help you choose.
Split the blade into three zones: convex side, concave side, and leading/trailing edges. Each zone requires a different toolpath strategy. For example, the concave side needs a variable step‑over to avoid overcutting the fillet radius.
Select a ball nose end mill (e.g., 6 mm diameter, 2‑flute carbide) with extended reach. Measure the holder’s geometry – free‑form toolpaths automatically check for holder‑to‑blade clearance. Input the exact dimensions into the CAM tool library.

This is the core of free‑form toolpath setup. You must define how the tool tilts as it moves. Common strategies:
Lead/Lag angle – tool leans forward (lead) or backward (lag) along the cut direction. Use 5‑10° lead to avoid center‑cutting on ball nose tools.
Side tilt angle – tool leans left/right relative to the surface normal. A 2‑5° side tilt prevents rubbing.
Automatic collision avoidance – set a safe retract distance and let the CAM software recalculate tilt angles dynamically.
For turbine blades, a variable lead‑lag strategy works best: high lead on convex surfaces, near‑zero lag on concave curves. An technical paper on tool axis optimization provides deeper formulas.
After setting parameters, generate the toolpath. Use the CAM’s 5‑axis simulation with collision detection. Check for:
Smooth tool axis changes (no sudden flips)
Step‑over pattern consistent with blade curvature
No holder interference
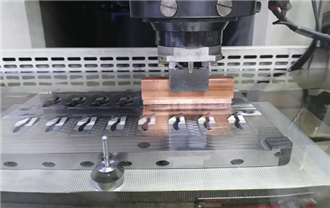
The image below shows a verified free‑form toolpath on a turbine blade:

Finally, post‑process to G‑code using a machine‑specific post‑processor. Run a dry test on foam or wax before cutting metal.
When you set up free‑form toolpaths correctly on a precision 5‑axis CNC, you achieve:
Surface finish Ra ≤ 0.4 µm (no hand finishing)
50‑60% shorter cycle time compared to 3+2 indexing
Tool life increased by up to 3× due to constant chip load
Setting up free‑form toolpaths is the real skill behind precision 5‑axis CNC machining of complex turbine blades. By following the five steps – CAD alignment, region definition, tool selection, axis control, and verification – you can reliably machine aerospace‑grade blades. Invest time in learning your CAM’s 5‑axis module, and always simulate before cutting.
1. Which CAM software is easiest for free‑form toolpath setup on turbine blades?
Siemens NX and hyperMILL offer dedicated turbine blade wizards that automate axis control and region splitting. Mastercam and PowerMill require more manual setup but are also widely used.
2. What lead/lag angle should I start with for a typical Inconel blade?
Start with 8° lead and 2° side tilt. Then adjust based on simulation – increase lead if you see center‑cutting marks, decrease if vibration occurs.
3. How do I avoid collisions on the concave side of a blade?
Use the CAM’s automatic collision avoidance with a 1‑2 mm safety margin. Also set a “tool axis smoothing” filter to prevent sudden angle changes that cause gouging.
4. Can I reuse the same toolpath setup for different blade sizes?
Partially – you can save the strategy template, but step‑over, lead angles, and holder clearance must be re‑calculated for each unique blade geometry.
5. What is the most common mistake when setting up free‑form toolpaths?
Forgetting to simulate the holder. Many users only check the tool, but the holder collides with the blade’s shroud platform or adjacent blades in multi‑blade setups.

Add: Building 3No.277 Zhen'an Middle Road, Chang'an Town,Dongguan,Guangdong, China
Tel:+86-769-82855591
Copyright © 2019 All Rights Reserved Dongguan Start Precision Technology Co., Ltd. Tel: +86-769-82855591
Add: No. 277 Zhen'an Middle Road, Chang'an Town, Dongguan, Guangdong, China
 中文版
中文版 English